Losi Lasernut u4
 Modified Losi Lasernut U4
While most people will agree that 2020 has been a terrible year, and while there have only been a few bright spots during this global mess, one of them is the newly released Losi Lasernut U4 buggy.
I had caught wind of this from a random comment on an internet forum, so I was ready to order once the buggy was made public. The very day it was officially announced in August, I put my name on the list and a few weeks later I had one in my hands.
While I’m pleased with how the Nomad DB-8 testing and evaluation project was presented, I’ve decided to take a much different approach with the Lasernut. Rather than waiting months to conduct extensive testing and documenting results, I’m changing direction for this particular vehicle and posting updates after each testing session in more of a blog format. I figured that other than the common overview videos, there won’t be much solid testing information for quite some time. Who better to get into the details, right?
Another difference from the Nomad review is that all performance assessments of the Lasernut will be based on results developed on our desert track, rather than a multitude of different surfaces. We recently finished completion on phase one of our new desert track, and the course is both challenging and enjoyable to drive. This desert track will soon have its own description page on this website. This way we won’t need to bog down in the details of the track during the performance updates.
From here, we will take a quick overview look of the Lasernut, as well as a few details about what I changed.
 Losi Lasernut U4 in Action!
The Losi Lasernut U4 is a four-wheel drive 1/10 scale off-road buggy designed to withstand the rigors of U4RC Rock Racing.
Interestingly, when you look at the overall length and wheel base, it actually has 1/8 scale dimensions.
Modeled after the excellent full-size U4 buggy was designed by Armada Engineering and sold to Lasernut Racing, this buggy features a fully-independent long-travel suspension, aluminum shocks, unique rear sway bar and body hinge system, as well as three fluid filled differentials.
Built around Spektrum electronics, the 1900 kV motor and 130 amp ESC is designed to run both 3s and 4s lipo batteries. This motor and 4s battery pairing is much more aligned with 1/8 scale buggies than their 1/10 counterparts. The Lasernut comes with two pinion gears to compliment the battery choice. From the factory is comes with the 12 pinion installed for running the 4s battery. The 3s pinion is 14 tooth.
Note: Pinion gears are Mod 1. The manual lists the wrong pinion sizes on page 39. The pinions are not 15 T / 17T - they are 12 T and 14 T.
The Losi website does a good job describing in greater details some of the features, so rather than rehashing any more specs, you can follow this link ( click on text ) here to the Losi website for this information: Lasernut U4 Information
Unfortunately the user's manual is pretty vague and only useful in initial setup and a looking part numbers. There are no measurements listed for any of the screws or bearings. This is lazy in my opinion and should be included in any quality manual.
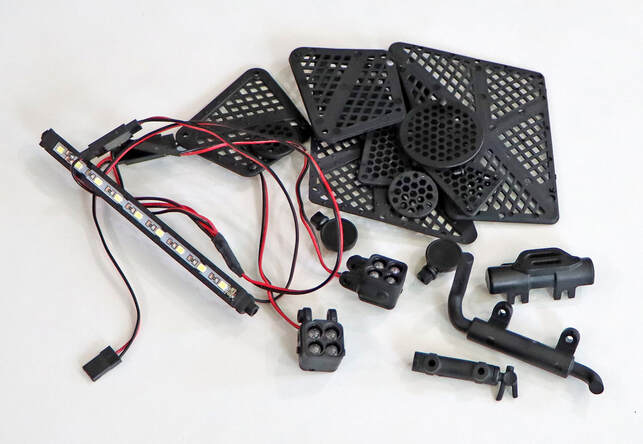 Lights and other decorations removed from the Lasernut.
Jumping right into the Lasernut, I removed a good amount of the “scale” plastic parts used to decorate the buggy. The buggy was new out of the box, and immediately I started making changes. Unfortunately I actually don't have a single photo of the buggy new from the factory. I probably should have snapped a few before I tore into it, but I didn't.
First to go were the lights; while pretty cool looking, these only get in the way during maintenance. I also don't drive at night.
There were some side plastic pieces, looking like mesh or maybe some kind of screen, but these are just decoration and have no air flow into the chassis. I clipped these off as well. The fake winch on the front was tossed into the trash, along with the side mirrors, fire extinguisher, and exhaust. I have very little interest in any "scale" parts; all they do is add weight and get in the way.
On my particular buggy, the stickers were poorly applied to the roof section, so off those came as well along with a few more stickers from the side. I'm currently waiting on the clear body parts to become more reasonably priced before I order a set and do my own paint scheme, but as of now I'm not paying $70.00 for a few bits of clear lexan.
The application of stickers and trimming of the body panels was a little off and looked like a rush job. Personally it didn’t bother me at all; this buggy was going to see extensive track use so the small details of the finish were of no concern.
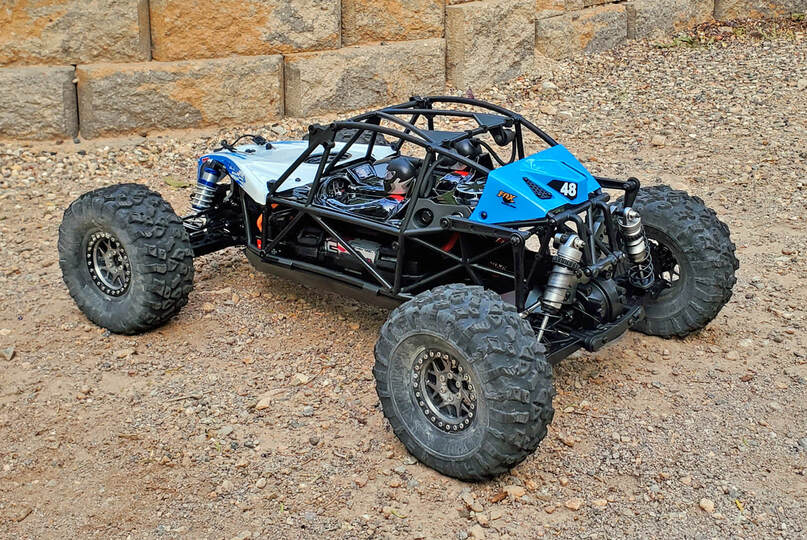 Spare tire removed and mount trimmed. Way better in my opinion.
Finally we get to the spare tire hanging off the back of the buggy.
Ascetically I find it interesting, but it does hang a considerable amount of weight off the rear of the buggy.
Some of the initial press release videos gave the impression that this weight off the rear will help the buggy fly level in the air off of massive jumps.
Comparing that to a few of the jumping videos of the Nomad DB-8 which lacked the weight in the rear, that buggy struggled off of jumps by dropping the nose, so I think Losi's idea makes some sense, but for the most part it's just decoration.
That said, I had no intentions of jumping, flipping, launching, or bashing the Lasernut, but rather my attention is 100% focused on desert track results. Holding the Lasernut in my hands, I could feel the weight of the rear tire and mount hanging off the back. In terms of handling, hanging a big weight off the rear of any vehicle is a terrible idea and would never be done unless absolutely necessary, and is in 1:1 true desert racing. For my focus on desert track performance, the spare tire wasn’t needed so off it came.
After removing the tire, I looked over the plastic mounting frame and cut away the key parts which were needed to mount the tire but left the parts which facilitated the function of the body hinge.
Once removed and the mount modified, I was much more pleased with the overall look of the Lasernut. It also balanced just slightly forward of mid-chassis, and this would help cornering traction immensely.
 Bearing installed in steering posts.
With the cosmetics taken care of, it was time to look inside and see how well the drivetrain was setup. With the lights removed, completely separating the body from the chassis is fairly easy and can be removed with just a few screws.
After the body was removed, I pulled the top main
chassis brace, and this exposed the steering linkages and center differential. Dropping a few screws from underside of the chassis allows for the motor, center differential, and drive shafts to come out. Fairly standard layout.
Starting at the front, right away I found one of the bulkhead screws stripped in the housing. Luckily most Losi parts are fairly cheap and I added a set of bulkheads to my spare parts list.
There was a bit of grease on the front ring and pinion gear set, and the differential was half full of clear silicone oil. This oil was cleaned out and refilled with 10k TLR silicone oil. During this process I removed the front sway bar. With the chunky and tight technical track for the Lasernut, I wanted as much free suspension movement as I could get away with.
The shocks were set up surprisingly well and filled to the top with fluid, but there are not dust boots mounted on the shocks, and from the looks of the shock bodies, there is no provision to mount any kind of boot. In our dusty conditions this will require additional maintenance or some handy work to fit a boot over the shafts.
I also noticed the lack of droop screws on the A-Arms. Considering the track conditions that I planned on running, this is no big deal, but it might be worth adding some in if you plan on airing out the buggy frequently. While I was there I removed the brass steering post bushing and installed bearings.
 Motor and Center Differential Cover. Upgraded Outdrives.
Moving to the center differential, this unit is covered by a nifty rock guard which covers both the differential and pinion gear. For desert racing, this is such an important feature and many manufactures do not offer this. On the down side, it does feel a little flimsy, and I’m not a fan of plastic differential housings, so hopefully I can track down a TLR aluminum differential mount that will also let me still use the cover.
You will also notice that there is no debris slot underneath the spur gear. With the cover this is not needed and will help prevent dust and fine dirt coming in through the bottom of the chassis. Overall, Losi got it right with this motor and spur-gear cover.
Looking into the center differential, I found this to be virtually empty with just a light glossing of oil on the inside. There didn’t seem to be any leaked out and oiled in the chassis, so most likely this simply got missed during assembly. I’m not a fan of the very small screws for the diff housing, and you need to be careful when servicing these pieces.
Stripping a screw heads looks easy to do, even on this aluminum housing. I’m not sure if it's that important to note, but the center differential housing is aluminum, whereas the front and rear are plastic. I actually prefer plastic differential housings from Tekno and Team Associated, but unfortunately they do not fit.
From what I understand, this differential size is standard on most of the Losi 1/10 platforms. I had become accustomed to the Team Associated Nomad’s beefy differentials, so these seem not half as robust in comparison. While the Lasernut does have a large footprint, it’s definitely built with 1/10 scale parts.
Also note that the differentials have four spider-gears inside and not two. After placing a bit of grease on the O-ring, I filled the center differential with 10k oil and reinstalled.
Moving to the rear, this differential was half full but in good condition with an adequate amount of grease around the pinion gear and ring. This differential was cleaned out and filled with 7k fluid. The shocks were also full and had a good feel to them. Like the front, they lack dust boots and there were no rock guards on the A-Arms. This will surely foul up the shock oil in short order, so boots and rock guards were added to the list of things to solve.
With the Lasernut back in one piece, I charged up a 3s battery and headed out to the street to see how it felt. Driving around, I could feel the sluggish OEM servo, and I already knew that was going to be replaced right away. Luckily I had a spare Savox 1201mg servo looking for a new job.
I’m not saying you need to replace the servo, but I can’t imagine getting good performance on a track with these massive tires running a basic RTR servo.
The suspension felt very plush and responsive, rocking to the side slightly in tight corners but not lifting the inside tire or losing its balance. Dropping off a few curbs at slow speed, the shocks soaked up the drops very well, almost with a rock crawler type of feel. I made a few more adjustments to the ride height and adjusted the rear camber links to get a negative tilt to the tires.
I rolled around for a bit longer and headed back into the shop. I wanted to get the servo replaced and the wheels and tires changed out.
With the Lasernut back on the workbench, I noticed some fluid had leaked out from the front shocks, leaving the shock spring carriers and rod ends slick with fluid. A quick look under the caps and they were both down to half full, so there was a leak at the bottom of the shock. I decided to pull the front shocks to check them over later and installed a spare set of Pro Line SCT shocks. The rear shocks looked fine and had no leaks, so for now these will stay on the buggy.
I filled the front shocks with 35 weight TLR shock oil and the rears with 30 weight TLR shock oil.
 Note the location of the transmitter receiver stuck to the side of the servo.
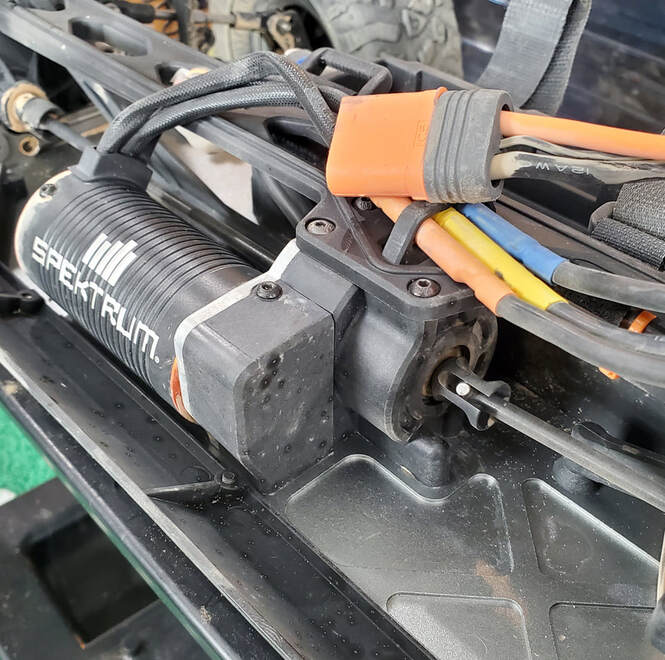
With the suspension ready to go, I needed to address one more detail: receiver location on the buggy.
Losi has decided to stick the Spektrum transmitter receiver on the side of the servo, most likely for the sake of simplicity, and while the body does protect it to some degree, it’s literally sitting directly behind the front right tire and strikes me as a terrible location.
When making a right turn, the knobby tires are going to funnel dirt, dust, rocks, and any other debris scooped up by the tire cleats. It strikes me as an odd oversight.
The receiver is not the only poorly located electronic, the ESC is in the same situation on the other side of the chassis. Located directly behind the front left wheel and partially exposed to debris thrown off the front tire, the ESC is going to eat all kinds of rock and dirt.
This frustrates me immensely and I’m not sure why this decision was made.
Looking at the layout, the battery tray should have been moved forward and the ESC located behind the tray, with the receiver next to the ESC. This way both would have been far more protected by the body and battery tray, and the room is there.
I was able to get a photo of my friend's Lasernut which has only seen a tire change with no adjustments to the internals. In this photo you can see the transmitter receiver double-sided taped to the servo.
 Small receiver box installed. Don't mind the CF towers and shocks for now.
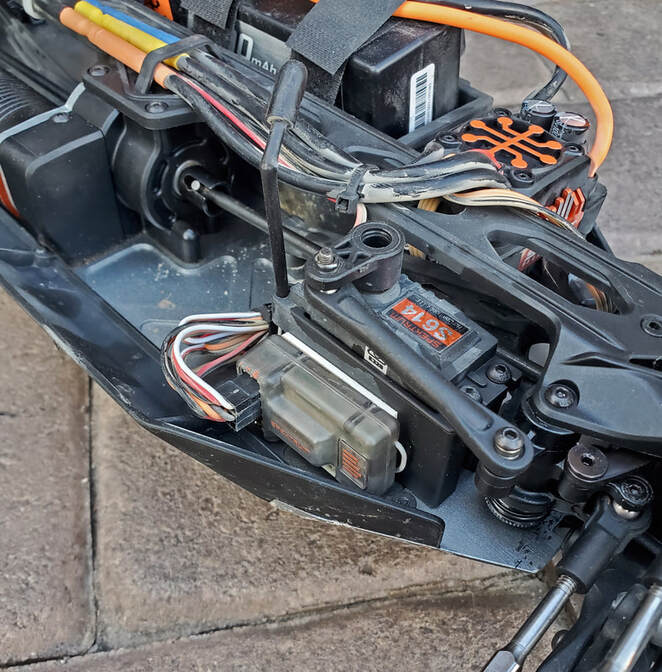
That said, I experimented with a few ideas to relocate the receiver. My first idea was to install it in a small Losi receiver box and mount this behind the battery try.
It can be done, and there is enough wire from the servo and ESC to make that location work, but I had to cut a notch in the upper bulkhead brace.
I think the massive bulkhead brace is clumsy and could have been executed far better, but from what others have told me, the brace is needed for bashing purposes.
With the notch in the brace, I didn’t notice any problems on the track, but again I do not launch or bash the Lasernut. So, make this change at your own risk.
The corner of this receiver box also would catch the side of the roll cage inside the body and push it slightly to the side when the body and cage was fixed in position. I drove with this for some time and didn’t care for it.
Some other people have fit this box next to the servo by cutting away some of the plastic chassis skirt and grinding down some aluminum, and I looked this over but didn’t favor the idea.
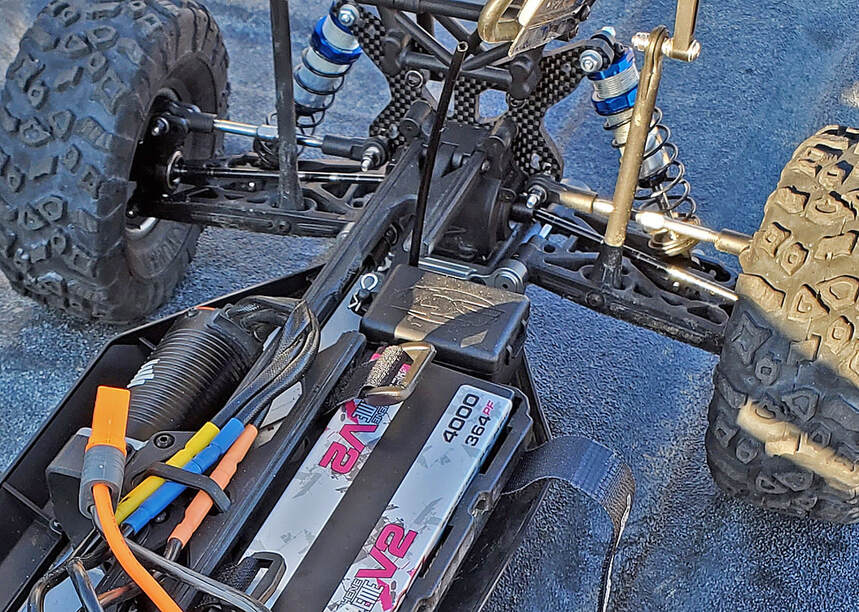
 Simple relocation of the receiver behind the battery tray.
I kicked around a few ideas one afternoon in the shop, and at some point I happened to see my Axial Wraith Spawn crawler sitting on the shelf, and this gave me an idea. When I set up the Wraith, I moved most of the internals to new locations for balance purposes, and the receiver was one of those “where should this go?” items.
A fellow RC enthusiast said that he would slide the receiver into a small plastic bag and seal the end with some tape and a rubber band, and then zip-tie it somewhere out of the way. The plastic bag gave much better protection than having the receiver sitting in the open, and the bag adds almost no weight to the vehicle.
In comparison to a rigid receiver box, the plastic bag option makes for a smaller and lighter receiver setup, as well as having more options for location.
I had set up my Wraith that way, so I decided to give this a go for the Lasernut.
At this point I was already over the Spektrum transmitter included with the Lasernut and wanted to switch to my Spektrum DX5 Pro. The idea of a small antenna from the receiver sticking out of the plastic bag bothered me, so I installed a Spektrum Micro Receiver (SPMSR2100) with a built-in antenna and paired it with my DX5 Pro.
With the receiver slipped into a small plastic bag and folded over, all that I needed to finish up the install were a few pieces of Gorilla tape to secure the folds and a few small zip-ties to secure the receiver to the back of the battery tray and bag opening.
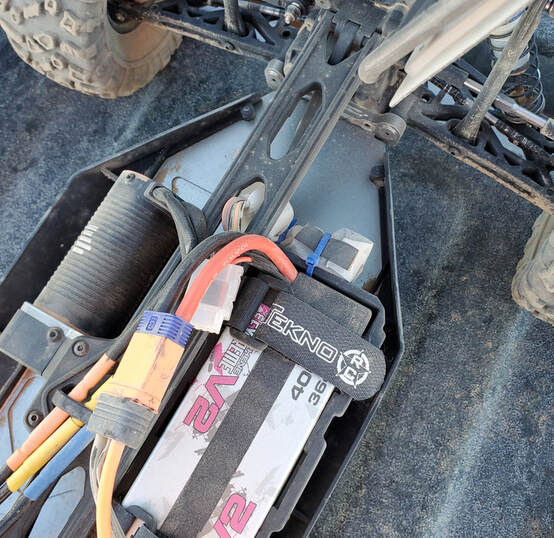
This still didn’t solve the ESC location issue, but at this point is that when the ESC dies, I’ll upgrade the unit and then do the battery tray / ESC location swap.
Until then, I was ready for some desert track work over at Dusty Corners. (Link Here) If you have not checked out that tab on the website, do so before you get much further in this review. I’ll be making references to the track and how the Lasernut handled the terrain.
A fellow RC enthusiast said that he would slide the receiver into a small plastic bag and seal the end with some tape and a rubber band, and then zip-tie it somewhere out of the way. The plastic bag gave much better protection than having the receiver sitting in the open, and the bag adds almost no weight to the vehicle.
In comparison to a rigid receiver box, the plastic bag option makes for a smaller and lighter receiver setup, as well as having more options for location.
I had set up my Wraith that way, so I decided to give this a go for the Lasernut.
At this point I was already over the Spektrum transmitter included with the Lasernut and wanted to switch to my Spektrum DX5 Pro. The idea of a small antenna from the receiver sticking out of the plastic bag bothered me, so I installed a Spektrum Micro Receiver (SPMSR2100) with a built-in antenna and paired it with my DX5 Pro.
With the receiver slipped into a small plastic bag and folded over, all that I needed to finish up the install were a few pieces of Gorilla tape to secure the folds and a few small zip-ties to secure the receiver to the back of the battery tray and bag opening.
This still didn’t solve the ESC location issue, but at this point is that when the ESC dies, I’ll upgrade the unit and then do the battery tray / ESC location swap.
Until then, I was ready for some desert track work over at Dusty Corners. (Link Here) If you have not checked out that tab on the website, do so before you get much further in this review. I’ll be making references to the track and how the Lasernut handled the terrain.
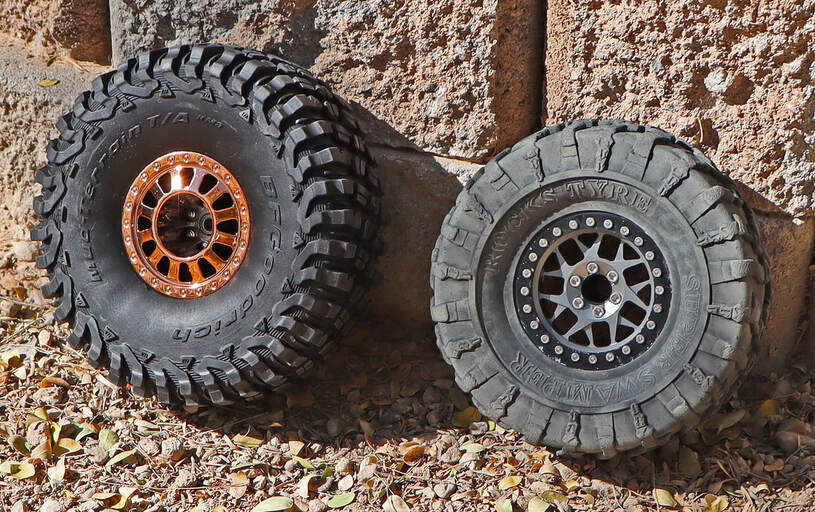
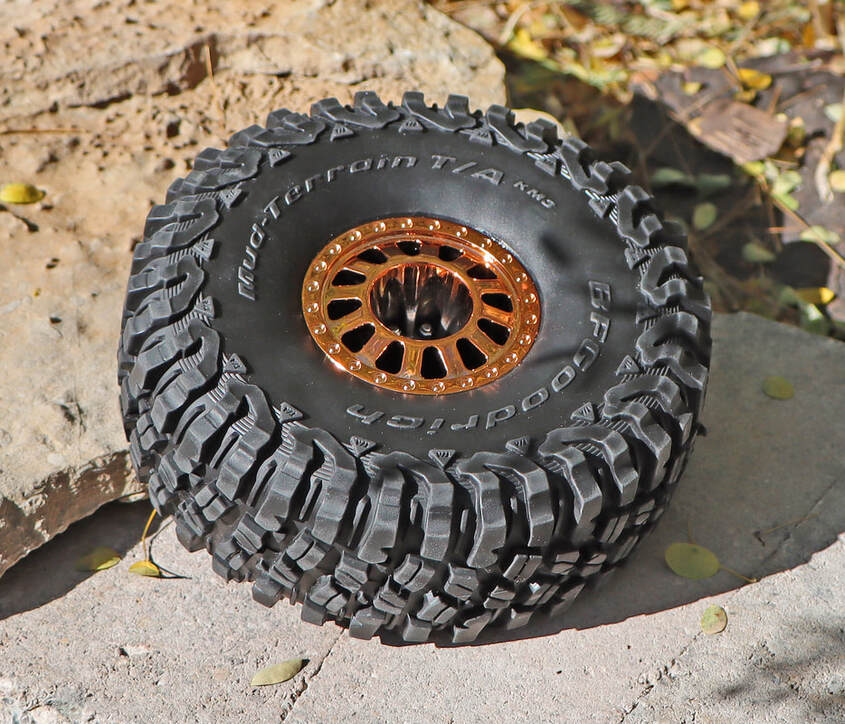 Losi knocked it out of the park with these OEM wheels and tire.
Factory Wheels and Tires
The factory wheels and tires are one of the highlights to this buggy, and it’s a bonus that you end up with five of them with the Lasernut.
If for some reason you crack a wheel or tear a tire, you have a spare ready to go. The metallic bronze color of the wheel adds a nice touch.
Losi selected a licensed copy of the BF Goodrich Mud-Terrain TA tire which measures 5.75” tall and 2.25” wide, and mounted on a 2.2 / 3.0 plastic wheel to fit the standard 12mm hex hub.
These are massive tires for any 1/10 platform, and the size is key in providing adequate ground clearance for the Lasernut.
Interesting, the wheel has a 2.00mm positive offset, and that coupled with the 3.0” inner wheel diameter makes this setup very good for this buggy.
It brings the wheel close enough to the suspension linkages to provide excellent steering response and a bit of protection of the hub carriers.
Whoever designed this wheel and tire setup at Losi obviously studied U4RC and knew what they needed to accomplish, and they absolutely nailed this part of the Lasernut.
The tire itself looks very well made and from a soft type of rubber, and there is an excellent level of detail in the tires. The cleats of the tread are clearly defined, and the pattern is close to the 1:1 original, which will surely bring joy to the hearts of many RC Scalers.
The foam inside feels to be the standard open-cell type commonly found in virtually every OEM wheel and tire combination.
Looking close at both sides of all five tires, the gluing job of attaching the tires to the wheels is very good. It’s uniform to the point that I’m thinking they are using a fixture for the process rather than a few guys sitting at tables doing this by hand. I bring this up because the tires are quite large and heavy, and a poor job gluing the tires will have these ripping free from the wheels under full power. Losi got this perfect on my particular buggy.
 Other side of the OEM wheel and tire. Excellent quality.
I’m pretty sure at this point most of you are wondering why there are no photos with the original wheels and tires on the Lasernut?
My thought on this was to figure out all the details about the Lasernut while running a set of aluminum beadlock wheels, testing out various tire and insert combinations in order to figure out what the best setup for the Lasernut is on a real desert track.
Once that’s accomplished and testing is completed, I’ll go back to the OEM wheels and tires to see if there is a measurable change in performance on the same track.
I believe that for many Lasernut owners who are not going to take such a close look at tire and foam options, then sticking with the OEM wheels and tires will most likely be completely adequate to their needs.
That said, I personally want to dig deeper into the Lasernut and learn more about its potential. Thus for the time being, I pulled the OEM wheels and tires off the Lasernut to save them for a later date of testing.
 These Vanquish hubs give you the correct offset when using their wheels.
Aftermarket Wheels and Tires
With the OEM wheels set aside, I headed over to our rock crawler wheel and tire rack and started looking through the various 2.2” aluminum beadlock options.
One enjoyable aspect to rock crawlers is testing out different wheel and tire and foam combinations while out on the trail.
Over time I found it easier to set up different combinations at the shop with extra sets of beadlock wheels, and then bring them to the trail ready to swap out in just minutes.
This practice has continually added 2.2” beadlock wheel sets to the collection, so after checking to see what wheels were not part of an ongoing crawler project, I picked out two set of aluminum beadlock wheels, a new set of basic open-cell foams, and eight off-brand 2.2” crawler tires. This would get me on the track for some laps to see just what this Lasernut was all about.
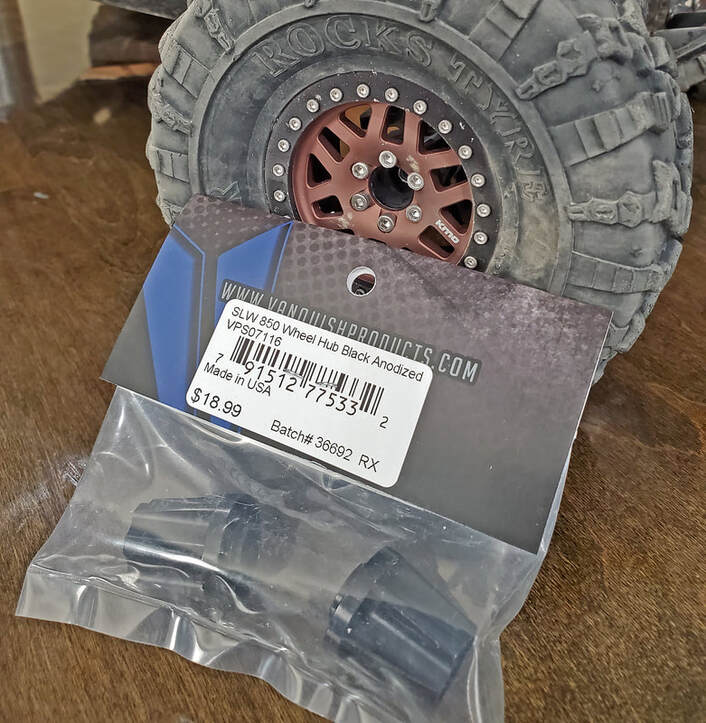
I tested out a few hubs from my collection for best fit, and the only ones I found that worked perfectly on the Lasernut were the Vanquish Products SLW 850’s ( VPS07116 ). Anything shorter and the wheels would rub the screws securing the front spindle carrier when turning sharp corners.
With the OEM wheels set aside, I headed over to our rock crawler wheel and tire rack and started looking through the various 2.2” aluminum beadlock options.
One enjoyable aspect to rock crawlers is testing out different wheel and tire and foam combinations while out on the trail.
Over time I found it easier to set up different combinations at the shop with extra sets of beadlock wheels, and then bring them to the trail ready to swap out in just minutes.
This practice has continually added 2.2” beadlock wheel sets to the collection, so after checking to see what wheels were not part of an ongoing crawler project, I picked out two set of aluminum beadlock wheels, a new set of basic open-cell foams, and eight off-brand 2.2” crawler tires. This would get me on the track for some laps to see just what this Lasernut was all about.
I tested out a few hubs from my collection for best fit, and the only ones I found that worked perfectly on the Lasernut were the Vanquish Products SLW 850’s ( VPS07116 ). Anything shorter and the wheels would rub the screws securing the front spindle carrier when turning sharp corners.
 Lasernut 2.2" / 3.0" OEM wheels and tires.
Stepping back, it’s important to explain some fundamental differences between the OEM plastic 2.2” / 3.0” wheel and a 2.2” aluminum beadlock wheel built for crawlers.
First and most importantly, while the outside wheel diameter is the same, the inside wheel diameter is very different. The Lasernut uses the 2.2” / 3.0” wheel dimensions, which means the outside wheel diameter is 2.2”, but the inside is 3.0” in diameter.
This larger inside diameter allows the wheel to clear the steering linkages and spindle carriers. Depending on the buggy or truck, ideal handling is very dependent as to how close or far out the wheels are mounted. This specific aspect of wheel spacing is a whole article and conversation into itself, so for now just understand that 2.2 / 3.0 wheels have a larger inside diameter than outside, and tend to have some overlap of the inside 3.0” wheel diameter over the steering linkages and spindle carriers.
The 2.2” / 3.0” wheel is the most common and popular plastic molded wheel on the market today. These wheels are one molded piece of plastic; no screws are used to hold the wheel together. Their simple design, one piece molding, and standardized use makes them relatively inexpensive at about $30.00 for a set of four wheels.
To mount the wheel to the vehicle, these plastic wheels have a hex hub fitting molded into the wheel, and you can see that in the previous photos of the wheel in this article. In this particular instance that is a 12mm hex.
In order to attach tires to these plastic wheels, glue is placed into grooves on the edges of the wheels and the tire lips are pressed into these groove and held in place with rubber bands or hand pressure until the glue dries. There is no mechanical lock securing the tires to the wheels, as well as no air pressure to seal a tire bead to the wheel. The glues used are commonly referred to as “Super Glue,” and these do a very good job at bonding the rubber to metal. The down side is that it’s tricky to remove the tire and usually not done unless the tire is worn and needs replacement.
 Vanquish Products 2.2" aluminum beadlock wheel.
In comparison, aluminum beadlock wheels come in a few different sizes, with 2.2” being the largest size and most common for large crawlers and rock racers.
These wheels a commonly build from five individual parts. You have the inner aluminum inner locking ring, an inside wheel half, and outside wheel half, the outside beadlock ring, and the hub. All parts are machined from aluminum and held together with a number of screws. While pricing and quality of these wheels have a wide range, they are all fundamentally identical in setup.
Unlike the plastic wheels, these wheels measure 2.2” in diameter on both sides of the wheel. Owing to its name, beadlock wheels use the mechanical clamping force of the outside beadlock ring and the inside wheel to pinch the tire’s bead against the aluminum locking insert, thereby “locking” the tire to the wheel.
Many people wonder how strong this locking force is and if it can adequately secure the tire to the wheel at high speed. From our testing on multiple platforms, there is nothing 4s power and under that has even come close to pulling the tire free from the wheel. From my personal experience, I have never encountered a single failure due to a tire slipping free from a beadlock.
 Vanquish Products wheel with black 850 SLW hub extension.
Unlike the OEM wheels with the molded-in hex hub, aluminum beadlock wheels are not machined with any hub, but left flush inside the wheel and designed to use interchangeable hubs.
To make these wheels fit on any vehicle, you need to select a hub that provides the correct amount of wheel clearance, and these are commonly referred to as “extensions.”
Depending on the wheel manufacturer, some come with a set of hubs but most do not, allowing you to pick the correct hub length for optimal spacing on your vehicle.
For the Lasernut, you need long hubs that extend out far enough to clear the steering linkages. Solid axles can get away with shorter hubs because they do not have the hub carriers of large steering linkages like an IFS system.
 Nomad DB-8 with Motoworx 2.2 beadlock tires easily withstood intense punishment on the track.
It’s also important to note that 2.2” / 3.0” tires are not interchangeable with 2.2” tires.
This matters because the 2.2” / 3.0” tire market is overwhelmingly oriented to Short Course Racing Trucks (SCT), 1/8 buggies, and many “Bashers” from the RTR world. These tend to use much small tires built for speed and handling.
The number of tall tires made for the 2.2” / 3.0” wheel, like the OEM tires on the Lasernut, are quite minimal and somewhat uncommon for any OEM offering in the 1/10 or 1/18 scale class. The Team Associated Nomad DB-8 is one of the few buggies which come with a tall tire on a 2.2” / 3.0” wheel.
Conversely, the number of tall off-road tires in the 2.2” class is many times greater. This is especially true for any tire over 4.50” in height. Many crawlers favor tall tires to help clear rough terrain, as well as using soft foams to allow the tall sidewalls of the tire grab the rocks by conforming to their shape. This is where tire foam inserts become very important developing the right feel and support of these larger tires, but we will save that for later on in the review.
At this point just know that if you want to experiment with tall tires, you should probably consider getting a set of 2.2” beadlock wheels. You will have a much wider range of tires to choose from, and the ability to easily test and tune your tire foams. This is much more of a pain to do with glued tires.
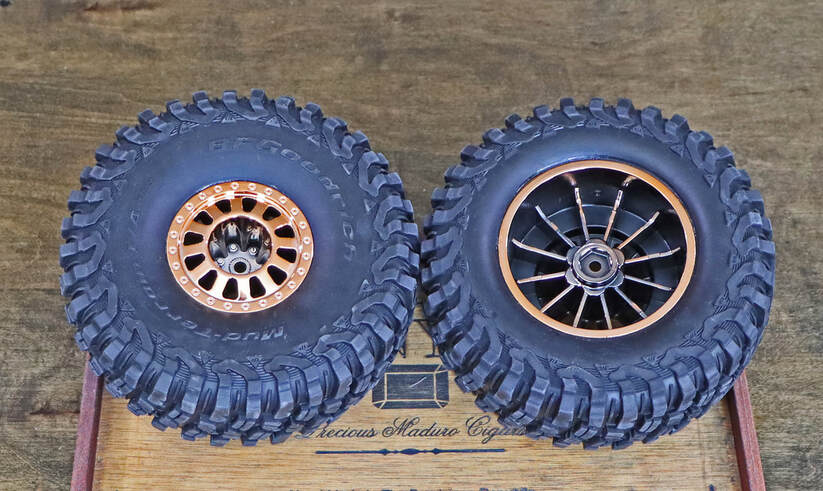
 Lasernut OEM ( L ) and Beadlock ( R )
Looking over the specs, I think it’s good to show some comparison between the OEM wheel and tire and the initial beadlock setup.
OEM Wheels and Tire: 236 grams / 146mm tall / 57mm wide
Aluminum beadlock: 242 grams / 130mm tall / 54mm wide
Two things stand out in these measurements; weight and height.
As surprisingly as it may be, the aluminum beadlock wheels and tires are only 6 grams heavier per unit than the OEM setup.
It’s understandable that many people are concerned about the additional weight of the aluminum wheels, and for sure they are heavier than a plastic wheel, but in this application as a rock racer, I do not believe it makes any bit of difference on a rock racing or desert track. The tracks are short and tight with many sections that force you to slow down, and the Lasernut’s 1900 kV motor and gearing will easily spin up these wheel and tires. That said, we will get into testing out the performance differences between the OEM wheel and tire compared to various beadlock setups later on during this review.
The second major difference is the shorter tire height with the 2.2” tires I selected. The smaller tire on the aluminum wheels helps to offset the weight gain from the aluminum wheels, but it does lower the chassis 8mm closer to the ground, and that’s not ideal for rough tracks.
As a first pass for testing, I think these will be a good starting point to build from.
 12 tooth pinion gear is great on tight tracks.
Pinion Gear Selection
One of the more interesting aspects about the Lasernut is that it comes with two pinion gears, and the manual states to use the 12 tooth pinion for the 4s battery and the 14 tooth for the 3s battery.
Continuing on, the manual states that running the 14 tooth on 4s could cause damage to the motor and ESC.
This is somewhat unusual to offer these options, but it seems that if you want to run 3s, Losi wants you to kick up the pinion gear to maintain some buggy speed.
Now before you say that other companies like ARRMA offer multiple pinion gears for a speed buggy or truck, keep in mind that those pinion change are to generate speed in relationship to the terrain, but it’s structured around using the same battery pack.
Losi took a different approach with altering pinion gear along with battery pack. You drop voltage with the battery ( 4s to 3s ) and increase the pinion size ( 12 tooth to 14 tooth ), which most likely is suggested to protect the motor from over-gearing and the excessive heat that causes, yet maintains some level of speed.
There is also the factor of the large tires this buggy has to spin; they are going to place much more of a resistance load to the drivetrain and subsequently to the motor, and this will be another cause of increased motor temperatures.
All things considered, Losi took a conservative approach to the gearing and battery setup, much different than the Basher market well served by ARRMA.
Knowing that I was going to test both 3s and 4s batteries on the track, I decided to leave the 12 tooth pinion is installed for the time being. With the larger tires and different wheels I planned on testing, I was less interested in top speed and more in bottom-end torque for performance.
I was also curious as to just how big of a difference the 3s would be on the track compared to the 4s battery with the same pinion.
 SMC 3s and 4s Lipo Batteries.
Battery Selection
With the pinion gear settled on, I needed to select a number of batteries for this project. Again, knowing that I would be looking at many different aspects of the Lasernut, I wanted to pick a set of batteries and stay with them for the duration of the testing program and not add in different battery brands as a variable.
Batteries vary greatly in quality and performance, so much so that I was shocked when I started experimenting with different brands. I had started out with Spektrum batteries for all of my buggies and trucks, enjoying their good solid performance and ease of use with my Spektrum charger.
Earlier this year I tried a few different batteries in my Nomad DB-8 with varying results, and one of the batteries that really stood out in performance was from SMC Racing. The power these batteries provide along with their surprisingly light weight makes them perfect for this project.
For test I selected three batteries from their 3s and 4s V2 Extreme Graphene line; True Spec Extreme Graphene V2 11.1V (3s) 5200mAh 120C wired hardcase (52383-3S1P) and the True Spec Extreme Graphene V2 14.8V (4s) 4000mAh 120C wired hardcase (40364-4S1P).
Each battery was numbered and noted on the testing logs. This way if I had a bad run and was suspicious of the battery as being the problem, I could set aside which battery was suspect and follow up on trouble-shooting the problem.
I had SMC set each battery up with an EC5 connector which are compatible with the Spektrum IC5 connectors. The only difference is that the EC5 does not have the “smart” wire which are found on Spektrum batteries.
 Excellent performance with the 3s SMC V2 battery.
First Testing Run
With most of the details sorted out for the time being, it was off to our desert track for some laps. I chose to start with the SMC 3s battery for the first number of laps around the track in order to get a feel for the Lasernut.
Pulling out from pit road, the Lasernut accelerated with just a bit of initial cogging into turn 1, deftly moving across the track’s rutted and rocky surface.
The wide stance of the Lasernut was immediately noticeable, with the buggy giving only a slight tilt with the body and keeping all four tires remaining firmly planted on the track.
I worked my way around the track at half throttle, watching the Lasernut navigate the corners and absorb the rocks and bumps. Just from its first lap, the Lasernut was clearly superior to the Nomad DB-8 in handling the rough surface. Rather than being jostled around by the rough terrain, the Lasernut’s fluid suspension movements absorbed a considerable amount of the bumps with very little upsetting of the buggy’s direction of travel.
After a few more laps, I increased speed to see just how the handling characteristics would change. Interestingly, the faster the Lasernut was pushed, the better it handled. The increase speed forced the suspension to make more substantial changes, showing more compression of the shocks as the tires pounded over the bumps and rocks. This characteristic is one of the natural traits found in fully independent suspensions when compared to solid axles; they maintain a level of predictable handling at increased speeds into corners.
 Losi Lasernut U4 kicking up dust.
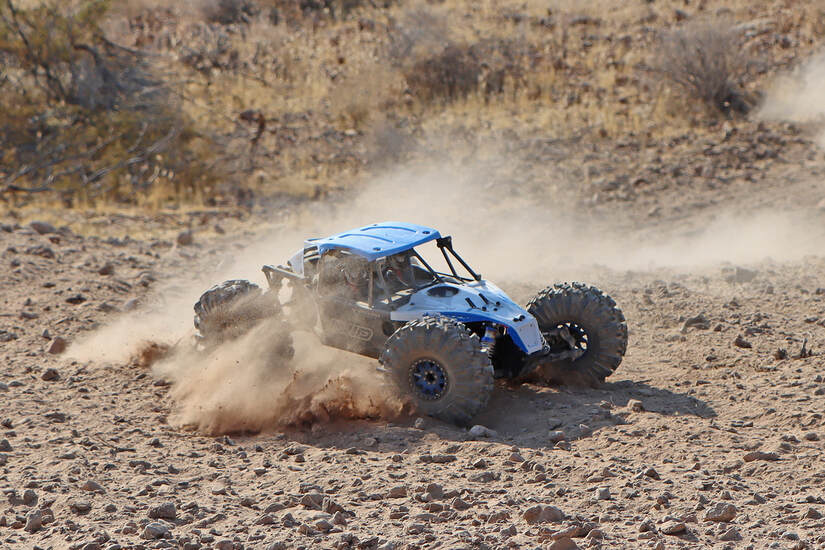
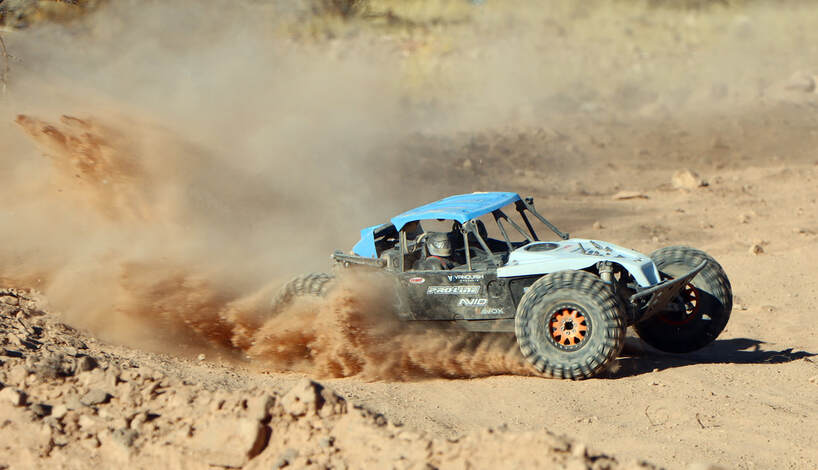
Our desert track is a tight and technical course, showcasing a pockmarked surface littered with loose rocks and fine powdery dirt dried out from over 200 days without rain.
This track forces the driver to come off the throttle and navigate the terrain and corners, and on this track the 3s battery with the 1900 kV motor was quite sufficient.
On the straight sections, I was able to use 100% of the throttle and maintain control of the buggy, but the tires could still break free from the loose terrain under heavy acceleration.
Ripping down the second straightaway and into turn 7, I blasted through the dip, launching deep into the corner and into some trouble. I needed to get on the brakes heavily to keep from overshooting the corner and into the rocks. Even though I was working the transmitter to turn the buggy to the left, the Lasernut wanted to continue on in a straight line. The culprit was the OEM servo, and its struggle to overcome the buggy’s forward momentum to turn the large tires.
Initially I had thought it to be a lack of power feeding the servo, giving the feeling of servo “brown-out,” but that wasn’t the case. Watching closely as I worked on the tighter corners, the servo just didn’t have the power to wrestle the large tires. I had been wondering when this issue would surface, and it clearly did on this corner.
I continued to run laps with the 3s battery, I was enjoying the handling of the Lasernut even though I had to compensate for the weak servo in some of the tight corners.
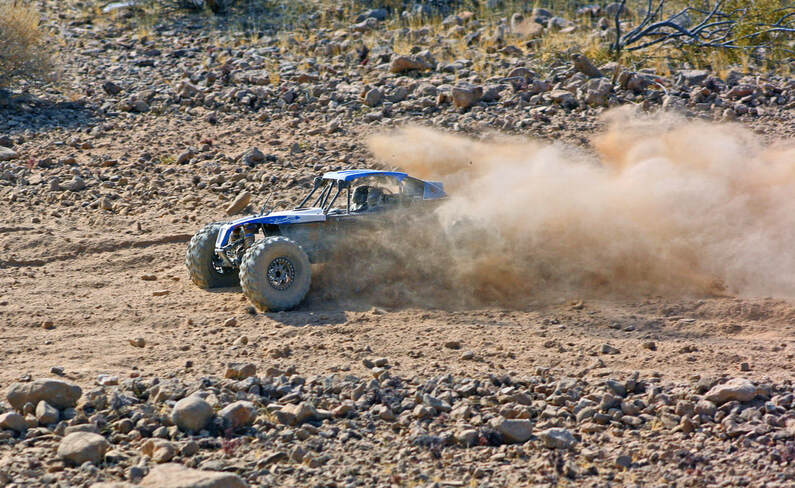
 Plowing through the loose, dry soil and rock.
After a number of laps, I brought the Lasernut in for temperature checks of the motor and ESC, and to change out the battery to 4s lipo.
The motor temperatures were in the low 130’s and the ESC in the mid 90’s. The inside of the chassis has some dust inside but only a few small rocks. The body fit to the chassis is very good, and prevents many of the rocks from entering.
I did that a moment and tightened up the servo saver a bit, hoping that would help the steering a bit.
Headed back out of the pits, the difference in power was immediately felt. Getting on the throttle, and the Lasernut launches down the track with gusto.
Right away I had to back off of the throttle to get the Lasernut back under control, and then work my way back into the right feel for how much power to apply in the corners.
The driving style with 4s lipo is completely different, providing an explosive acceleration element that can get you flying down a straightaway or cartwheeling off the track. With moderation of the throttle, the 4s battery gave me the feeling of untapped power in reserve ready to go at any moment. Attacking the corners, I could dive deep into the soft dirt and sand, letting off the power slightly to help the servo wrestle the tires into the right direction, then ramp the power back up and launch out of the corner.
The 4s battery provided seemingly bottomless power to buggy, and the pairing to the 1900 kV motor is a perfect match.
With the feel of the 4s battery, I continued to run lap after lap until the battery was drained. Periodic temperature checks showed an average in the mid 140’s, and other than a good amount of dust and some small rocks hitching a ride inside the chassis, I experienced no failures or issues.
The steering improved a bit, and it felt somewhat crisper on the sweeping corners, but in anything tight, I still felt like I was fighting to turn the wheels and tires.
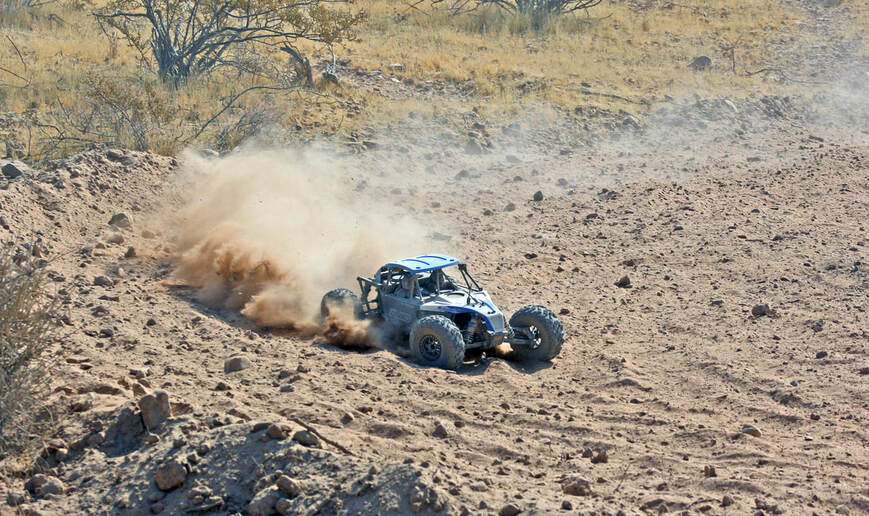
 Launching out of the dip into Turn 7.
I decided to swap back to the 3s battery again just to feel the difference, and on this tight track I didn’t find that running the 3s was a bad thing. If anything, I felt smoother in the driving and held cleaner lines around the track.
What I didn’t have was the explosive power to make passes on the track, but I also didn’t go cartwheeling off into the bushes when I made a mistake. The more I drove on 3s, the more I appreciated the handling and performance.
With the 3s battery, I could stay on the power into the corners and not break traction with the tires as I would with the 4s battery. There was a higher level of precision on the loose surface with the 3s battery. This was the first time I had ever done such a comparison between two battery power levels in such a specific fashion, and the Lasernut greatly changed its overall characteristics between the two.
Switching back to the 4s battery, I pushed the Lasernut harder around the track, using up as much real-estate in the corners as possible, trying to see just how much power I could get to the track’s surface without losing control.
 True desert racing.
Eventually I caught the outside edge of the tire in a deep rut, and the suspensions wasn’t able to prevent me from traction-rolling off the course.
Landing rubber side down, I maneuvered my way back to the course and continued the lap, but as the Lasernut passed by, I could see something looked strange with the front shock tower.
Pulling into the pits, I noticed right away that I bent back the left side of the front shock tower. It wasn’t terrible, but it did have the shock sitting at a funky angle.
I unhooked the top shock mount, and with a set of flat-jaw pliers I was able to easily bend back the shock tower into place. A few more moments to remount the shock, and the Lasernut was back on the track.
Finishing up the track session, the Lasernut was on-point and performed very well with the current setup. It was now time to take it back in the shop for cleaning and inspection.
 Back out on the desert track.
Back in the shop, I figured it was time for some maintenance and new AVID bearings. I’ve never been a fan of OEM bearings, and while the standard bearings from Losi may be just fine, but I replaced them with AVID rubber sealed bearings.
With so much sand and fine dust on the track, the bearings were going to need frequent cleaning and it’s just smart to start off with good quality bearings.
I didn’t get the fancy ceramic or anything like that, but stayed with the standard Halo line of their bearings. I find it easier to just change out to fresh bearings during maintenance, rather than pausing to clean and grease bearings, so I purchased three full sets at the same time. Cleaning and greasing bearings has its own scheduled day in the shop.
With the wheels pulled and new bearings in the hubs, I took the opportunity to install a Savox 1201 MG servo which I had on hand. Once the new bearings and servo were installed, I headed back out to the track for another round of testing. Again I selected the same pairs of 3s and 4s batteries from SMC, and started the day off with the 3s battery installed.
 Lap after lap.
The day was sunny and warm, nearly identical to the past three months of summer. Track conditions were the same as before; blown out and dry, even despite our frequent watering during the week.
The Lasernut rolled out from pit road and jumped right into the first turn, deftly skipping over the ruts and bumps. The rear end of the buggy seemed to have a bit of hop in the faster, sharp edge rocks, and I made a mental note to check the fluid levels in the rear shocks later that day.
The front end of the Lasernut tracked much better with improve steering in the tight corners. Halfway thought the first lap, the servo upgrade was proving to be the right move. The Savox 1201 wasn’t going to be the final servo in the buggy, but more a place holder until I picked up a more powerful unit. That said, for the time being the 1201 was performing admirably.
As my comfort grew with the Lasernut, I increased the speed and pushed harder into the corners and faster down the straightaways. Going through a few of the rougher sections, of the track, the bottom of the chassis was bouncing off of a few of the taller embedded rocks, making some terrible sounds. During the battery change to the second 3s battery, I made an adjustment to the ride height of the buggy in hope this would minimize some of the contact.
 Lasernut bouncing along the track's edge.
Out on the track, there was handling improvement, but still the buggy was hitting some of the rocks pretty hard.
This is one issues that the taller OEM tires would definitely help with. If you remember, the OEM tires are 146mm tall, while the Rocks Tyres are only 130mm tall. This shorter tire brings the chassis bottom 8mm closer to the ground, and on this track it will for sure be a factory in chassis wear.
With this setup, I completed another three track sessions, working my way through four batteries at each session. As I approached the end of this batch of sessions, I had found that the 4s battery to be best suited for the Lasernut. While the 3s is very enjoyable to drive, the 4s power makes the Lasernut competitive or flat-out superior to any platform on the track.
The 1900 kV and 4s is a fairly standard combination in many 1/8 scale buggy platforms, and this setup in the Lasernut clearly shows the logic of the setup. I found the extra power most helpful in passing situations, but on such a tight track I did need to use it sparingly.
At this point, the list of upgrades is pretty basic:
- Wheels / Tires
- AVID Bearings
- Savox 1201 Servo
- Upgraded Spektrum receiver
- Proline Racing Pro-Spec shocks ( front ) with orange springs.
 Team Ottsix USD Sticky's mounted on a set of Vanquish aluminum beadlock wheels.
The rock strikes were still concerning, so I decided after the third track session to swap out wheels and tires with the idea of putting taller tires on the Lasernut.
Fortunately I had a great set of the Team Ottsix USD Sticky tires mounted up on a blue Vanquish aluminum beadlock wheels ready to go. All I needed to do was swap to a 850 SLW hub to get the correct offset for the Lasernut.
Out on the track, the USD Sticky tires were excellent. The tires are 160mm tall and provided much better ground clearance, and the large tire cleats dug deep into the loose dirt track surface.
These tires hooked in so well that billowing plumes of dust kicked up into the air while rounding corners would temporarily obscure the Lasernut from view.
 Excellent ground clearance with the 160mm USD Sticky tires.
With such large tires, the 4s battery power was appreciate and I put it to good use muscling the Lasernut around the track.
Large tires like this do place more strain on the drivetrain, and some care needs to be taken when driving.
Launching from a dead stop on high-traction surfaces could tear up driveshafts and CV joints.
It might also be worth increasing the viscosity of your differential fluid if you chose these tires; it will help in keeping the power evenly spread between the tires.
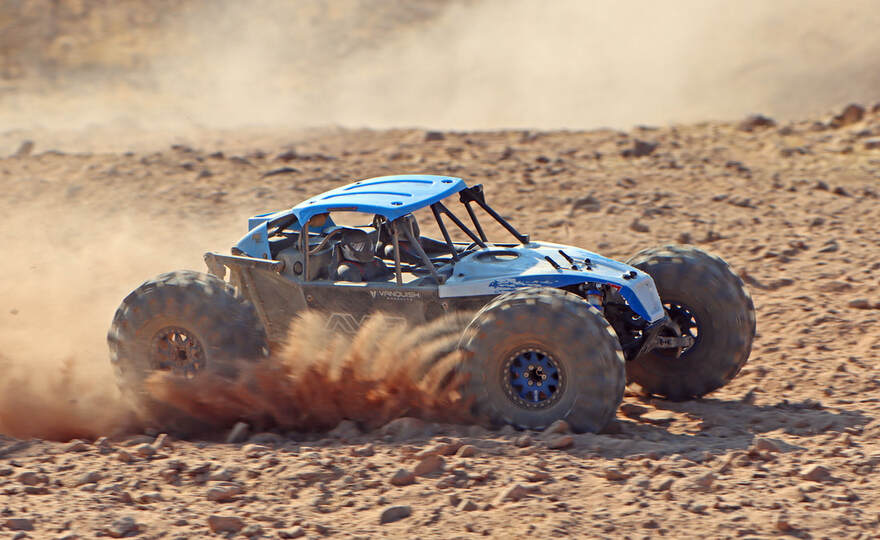 Lasernut hammering through turn 2.
Not only were the tires significantly taller, and thus improving ground clearance, the side cleats did an excellent job in the corners, hold tight lines at speed.
At times I worried about traction rolling in a few sections, but I found that they were only slightly more prone to rolling in tight areas as compared to the other set of testing tires.
As long as the surface is loose and rocky, I think these USD’s are in their element.
I ran a number to track sessions with these tires, and found them to be an excellent choice for desert track.
If there was one area for improvement, it would be with the tire foams. I was running a softer foam in these tires for crawling, and while the sidewall of the tire is rather stiff, there was some leaning and roll to the sidewalls when powering through corners.
Later on I will test out different foams in these tires to see if I can stiffen up the sides for a little better cornering.
For more info on the USD Sticky Tire, click on this link: USD Sticky Review
 Back of differential gear.
Back at the shop, it was time to service the shocks, diff fluids, change out the wheels and tires, and install a few new parts.
Starting with the differentials, overall they looked to be in pretty good shape. The bearings were a little tight on the outside of the differentials and took some delicate prying to remove. Inside I found the expected smoky grey fluid from the silicone oil breaking down due to heat and gear friction.
I removed the old oil and grease, and clean off each individual part. During this process, I found a few rough edges to the bottom of three differential gears where chips of metal had cracked off the edges.
This is not uncommon for lower quality cast metal or MIM ( metal injection molding ) parts. The damage can be caused by careless handling of the parts during manufacturing or debris in the molds that wasn’t cleaned out prior to the next parts run. The alloy of these parts tends to be of lower quality, and there is almost always a graininess to the exposed parts.
The damage on these gears was not caused from the operation of the differential, and interestingly when I went through my spare differential gears to replace the damaged item, a few of the gears also had the same chips on the edges, and these were new from the package. I suggest that when you order a spare set of differential gears, get at least two full sets. Fortunately there is a shim washer between the back of differential gear and the locating block in the differential, so this rough surface is protected from damaging any other parts.
I feel it’s important to point out that a replacement set of gears for the Lasernut is approximately $10.00 for all six gears, including cross pins, washers, and location blocks. That’s amazingly inexpensive, and I personally can accept that a few of the gears may need to be tossed out. If a company such as Robinson Racing were to offer this same gear set, made with the same detailed process and materials they use for their spur and pinion gears, this same kit would run well past $100 for the set of six gears.
Not only are sun gears more challenging to make when mechanically cutting them from solid billet, but the tremendous amount of hand detail work during the manufacturing process is going to be a major part of the cost. The customer would also have to account for the much higher quality of alloy used. My point here is to put into perspective what you get for the $10.00 price.
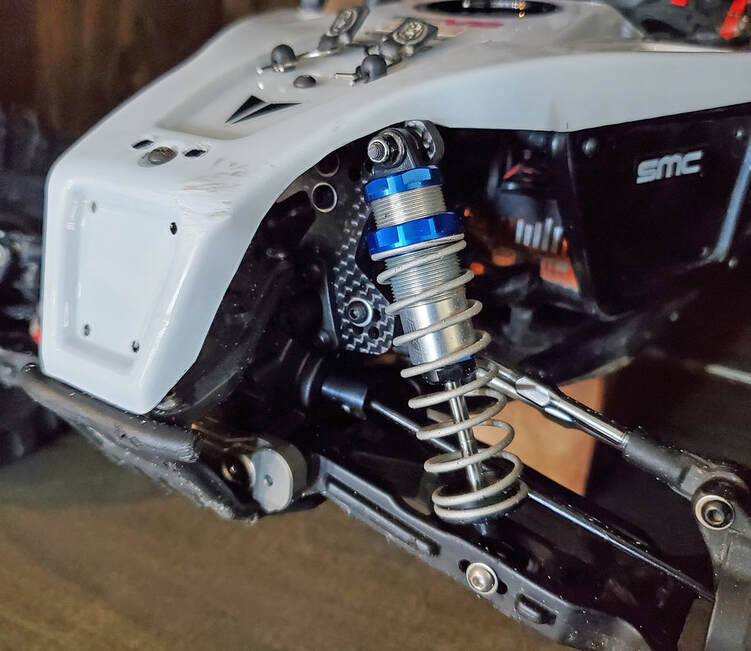 Pro Line Racing Pro Spec shock and carbon fiber shock tower
Moving over to the shocks, I swapped out the OEM rear shocks and installed Pro Line Pro-Spec rear shocks with purple-line springs ( 2.8 lb ).
The OEM shocks are of good quality, but not nearly as smooth as some of the better aftermarket options. For fluid I used TLR (Team Losi Racing) racing 25 weight silicone oil. I wanted to see if this would be thick enough to keep the shocks from cycling too fast and bouncing, but allow for quick small-bump compliance.
The front shocks were serviced and switched to a heavier front spring from their Power Stroke line ( red-line 4.4 lb ) to help maintain ride height without needing to bottom out the shock collar. Inside I used 30 weight silicone oil.
The OEM aluminum shock towers were replaced with carbon fiber towers, and the rear carbon tower is just a little different than the OEM tower. You will need to drill two new holes and mount the body hinge. The fit isn’t perfect, but as long as you don’t plan on spending too much time landing on the roof, carbon fiber towers will be fine. If you’re all about bashing and launching the Lasernut, you should stay with the aluminum towers.
To make the shocks fit better, I swapped out to a one-piece shock mount, but still I needed to trim away some of the carbon fiber tower to allow adequate room for the shock’s upper cap.
 Rear bulkhead with aluminum diff cups, TLR hinge pin holder, and CF tower.
With the differentials ready to install, I took the opportunity to replace the front bulkhead which had some damaged threads with a new unit, and then swapped out the steel hinge pin holder with adjustable aluminum holders from TLR.
These hinge pin holders come with various inserts to make a number of changes to the buggy’s suspension geometry. I was mostly interested in setting up the front with a bit more kick to deal with our track’s loose conditions. These new hinge pin holders also let you adjust the amount of rear toe-in, and this can be worthwhile to experiment with.
TLR has a great rundown on these setups and I have included the PDF in this article.
Another upgrade to the Lasernut was a set of aluminum bearing inserts for the rear bulkhead. These replace the plastic insets and maintain better alignment of the rear differential in the housing.
They are only offered for the rear differential. I set up with two shims on the bottom of the differential and one at the top.
|
TEN-SCTE 2.0 Tuning Tips
This PDF has some excellent information about buggy / SCT setup for various track conditions. It also explains how the adjustments will affect performance. If you are adding in TLR items, this is an excellent resource to have. |
| ||
The chassis was already showing some wear and damage from the rocks, and the OEM Lasernut does not come with any kind of skid plate protection for the bottom.
I find this interesting for a dedicated Rock Racer platform to not come with skid plates, but luckily RPM products makes a nice set of skid plates for the Lasernut.
The skid plates from RPM come with slightly longer screws to accommodate the added material from the parts, and they fit very well to the chassis bottom. Made from a hard plastic, these will be smooth enough to skip over large rocks while absorbing the more punishing damage from any sharp rock corners.
If you are indeed running in rocks or rough terrain like we are, these are pretty much a must-have item for the Lasernut.
The part number from RPM is 73182
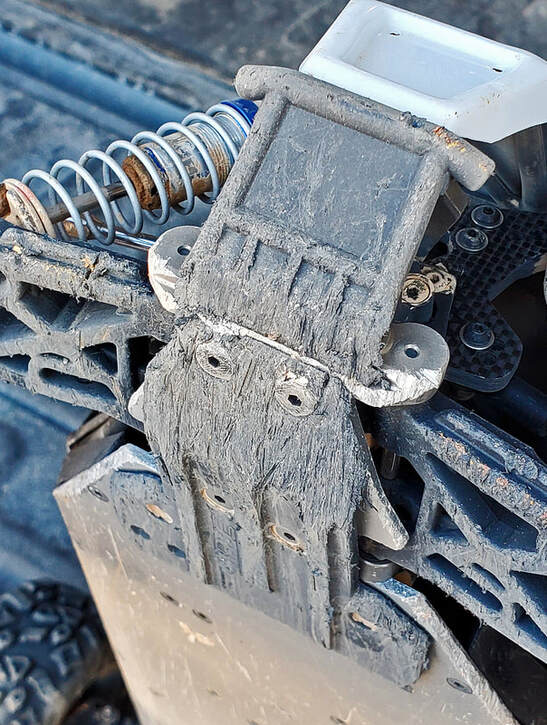 The desert track is an unforgiving surface.
I was looking forward to getting back out on the track, so the rest of the buggy was rebuilt and made read for testing the following day.
While working through the upgrades for the Lasernut, I was also experimenting with tire foams. I was finding that the standard open-cell foams were giving me inconsistent in performance on the track, but I need to really put the time in on the track to start sorting things out.
During any kind of desert track testing, the vehicle will take a beating, and the Lasernut was no exception. A usual day of testing would consist of running between four and six batteries, cover the span of three to four hours.
After each session, the Lasernut was cleaned and inspected, and by the end of the third day, a few problems surfaced.
The first and most obvious problem was the lack of protection the front bumper provides to the TLR hinge pin holders.
These are larger than the OEM steel holders, and with the narrow coverage from the front bumper, the plates were receiving a serious beating from the rocks. The front hinge pin holder needed replacement.
 TLR Hinge Pin Holder bending from rock strikes.
Noticing this damage, I pulled the hinge pin holders and found that each one had some level of damage, with a few even bending due to rock strikes.
Of all the damage, the front hinge pin holder was by far the most abused.
The front bumper may be neat looking and to “scale,” it does a rather poor job in protecting the front of the buggy.
A set of hinge pin covers will run you about $70, and I wasn’t amused to be replacing one of the holders so soon.
As you probably have gathered, I’m not here racing around in the street or jumping goofy ramps at the BMX park, but actually running this Lasernut on a real desert track, and it’s getting beaten down a bit too soon.
The hinge pin holder in this photo started out flat a few sessions prior.
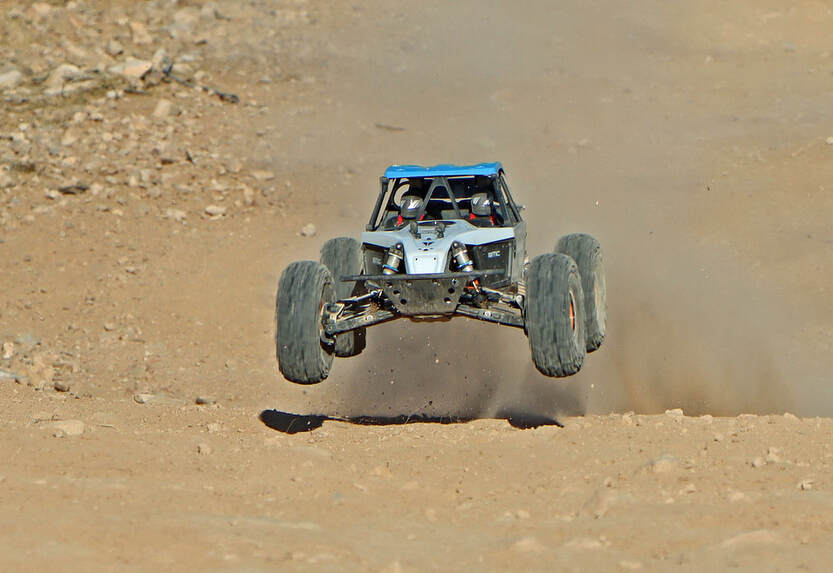 Lasernut U4 with new front bumper
What I needed was more protection for the front hinge pin holder, so I hunted around on the net and found a pretty good solution; Team Losi Racing SCTE 3.0 Short Course truck bumper.
This TLR bumper is wider and offers more protection from the front hinge-pin holder.
It also has more coverage front of the a-arms for when I miss a turn and fly off the track. As an added bonus, it looks pretty cool.
Unfortunately there is still a seam between the skid plate, so it’s not ideal, but it’s a heck of a lot better than the original Lasernut setup.
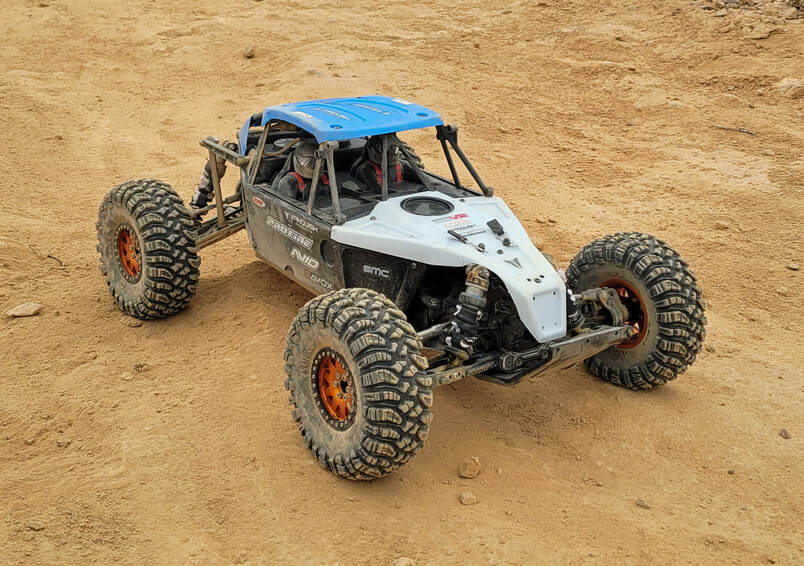 Losi Lasernut U4 Modified
At this point, I continued to make small changes in setup and parts, systematically working through the buggy to get the best performance possible while still staying with the OEM motor and ESC.
I found that getting the correct suspension setup took some time, and in efforts to get a bit more small bump compliance, I switched over to Team Associated V2 SCT shocks. These have a smooth and plush feel on the track, and when matched to a heavier set of Losi springs, they work pretty darn well. You will need to fool with the shock collar some to make the springs work, or you can try the TLR shocks that fit the springs. I've had good results with AE parts, so I went that route.
All that remains is working with the OEM wheels and tires, comparing them to the aluminum beadlock wheels and tires. That will be its own new tab under the Lasernut section. With that said, here is the current setup I’m running:
TLR LOSI TEN-SCTE 3.0 4WD Hinge Pin Mounts LOSB4112 LOSB4113 LX17
TLR03009 TLR LOSI 22SCT 3.0 SHORT COURSE TRUCK SHOCK MOUNTS
TLR03008 TEAM LOSI TLR 1/10 TEN-SCTE 3.0 SHORT COURSE TRUCK carbon REAR SHOCK TOWER
Losi TLR332001 HD Differential Housing w/Integrated Insert TEN-SCTE TEN-SCTE 2.0
Losi 232023 Diff Case Set: TENACITY SCT
TLR3100 Team Losi Racing Aluminum Rear Gearbox Bearing Insert Set (2)
Losi LOSB2963 Rear Shock Spring Tuning Set (8) TEN-SCTE
Losi LOSB2959 Front Shock Spring Tuning Set (8) TEN-SCTE
Losi LOS234021 Hinge pin & King pin Set TENACITY ALL
Team Associated V2 12mm Big Bore threaded aluminum shocks with 3mm shafts and X-rings
Losi Ten-SCTE Front Bumper & Skid Plate
Vanquish 2.2 beadlock wheels with 850 hubs
Axial Rip Saw Tires
Pitt Bull RC Dirty Richard tire foams
AVID bearings
TKR2210X - Tekno M6 Driveshafts and Lightened Outdrives (front/rear, SCTE)
Closing thoughts
Important Note: The following comments are based on the results of 63 desert track sessions and 145 battery packs as of February 10th, 2021
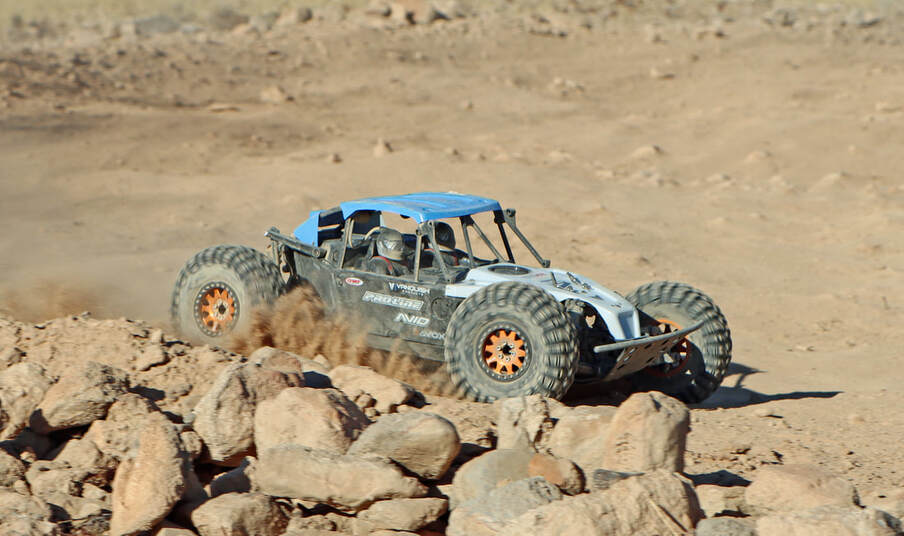 The Lasernut U4 is an excellent U4 buggy.
The Losi Lasernut U4 is an interesting buggy, more so for the unusual media surrounding the release of this new Losi product rather than the product itself.
If you set aside all the advertising for the Lasernut, you can focus on what actually sits in front of you, and that’s a fairly well rounded U4RC / desert buggy.
Much of it is based on the well proven Losi Tenacity platform, so from the get-go the Lasernut is going to be pretty good buggy.
Before we jump into the performance and modifications, let’s get the decoration stuff out of the way. I personally find the extra decorations distracting, cumbersome, and simply added unneeded weight to the platform, so I removed most of these items the moment I received the Lasernut. I feel that items such as lights are of no interest to me, same goes for fake fire extinguishers, winches, ect. I don’t bother setting these removed parts in a box or bin; they go directly into the trashcan.
The spare tire on the back can be argued that it helps the buggy when jumping (we will get to that in a moment), but in reality, it’s a terrible idea in terms of performance. It’s just added weight hanging off the back of the buggy. There is no reason to carry a spare RC car tire on the vehicle unless you appreciate “flair” – it’s not even close to scale in size, so call it what it is; “flair.” If you’re not familiar with the term “flair,” check out the 1999 movie Office Space.
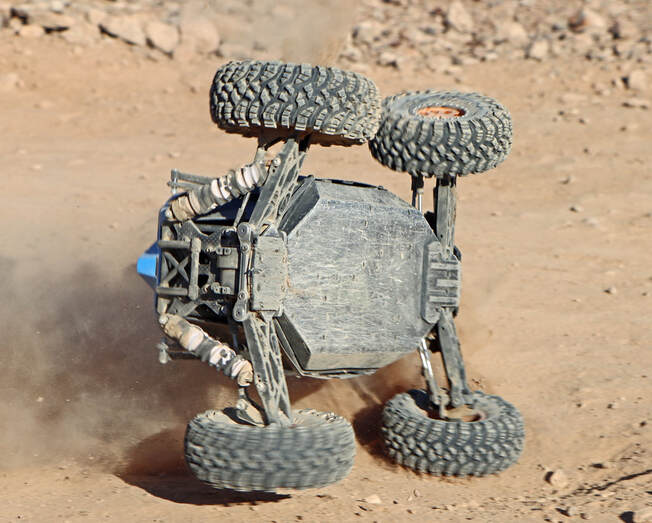 This doesn't end well.
This is not a basher buggy; it’s nothing close in robustness to an ARRMA. Looking back at all the media surrounding the Lasernut when it was released, there were many instances showing the buggy flying through the air, even jumping the full-sized version of the Lasernut in one video.
If hitting big jumps is on your agenda, be ready to break a lot of stuff. While sporting big tires and long suspension travel, this is still a 1/10 build with the same parts frailty commonly found on 1/10 vehicles.
The Lasernut is based on the Tenacity, which is really a race platform and not a basher. The A-arms are light weight and the bulkheads are a bit on the small side.
Losi did add in a large chassis brace down the middle, but the center differential housing is still 50% plastic and not heavy duty by any standards. You launch this buggy, it’s going to break.
I'm also hopeful that someone copies the ARRMA EXB style aluminum rod-brace down the middle and not this big, wide monstrosity that comes from the factory.
During my testing, the Lasernut was run hard over the desert course where there are no jumps or drops, just chunky rocks and loose dirt, and in these conditions I was able to bend hinge pins and quickly eat away the lower A-Arms. The bottom of the chassis is also taking a heck of a beating, but so far it's holding up.
The OEM front bumper is fashionable at best, but it does very little to protect the buggy. There is no rear bumper to speak of, so unlike the heavily armored ARRMA bashers which can take hard landings, the Lasernut is going to take the impacts directly into the suspension and these parts are not going to survive.
Regardless of intended use, outside of messing around in soccer fields or taking staged photos for “Tha Gram,” you should consider some kind of bumper upgrade. For desert track racing, I'm mostly concerned about a larger front bumper which protects the hinge pin holders.
 Lasernut making short work of Turn 2 on the desert track.
With all the extra flair removed from the Lasernut, it’s actually a surprisingly good desert buggy and U4 Rock Racer – and that’s what it is built for.
The handling is precise (with upgraded servo) and aided by the weight distribution being forward of the center differential (once you get rid of the goofy tire hanging off the back).
The wide stance, tall tires, and narrow chassis make it nimble and easy to drive in technical terrain.
It can also crawl over large rocks in a weird, spider-like way.
I find the Lasernut enjoyable to drive on both 3s and 4s, and you really don’t need to swap out pinions to a taller option when running 3s; this buggy is not built for speed. On tight, technical courses, running a 3s battery is plenty for this buggy. Because of the 1/10 build, the overall weight is low and the 3s battery will give you plenty of power for just about any rugged terrain.
On faster tracks, the 4s power can be put to good use, but again the Lasernut is not going to like flying off into the rocks or weeds when you lose control. The large tires put a tremendous strain on the suspension and steering.
Once I felt good with the upgrades to the suspension and tuning, I favored 4s power on our desert track. A few times it cost me with nasty wrecks, but overall I had the best results with 4s power.
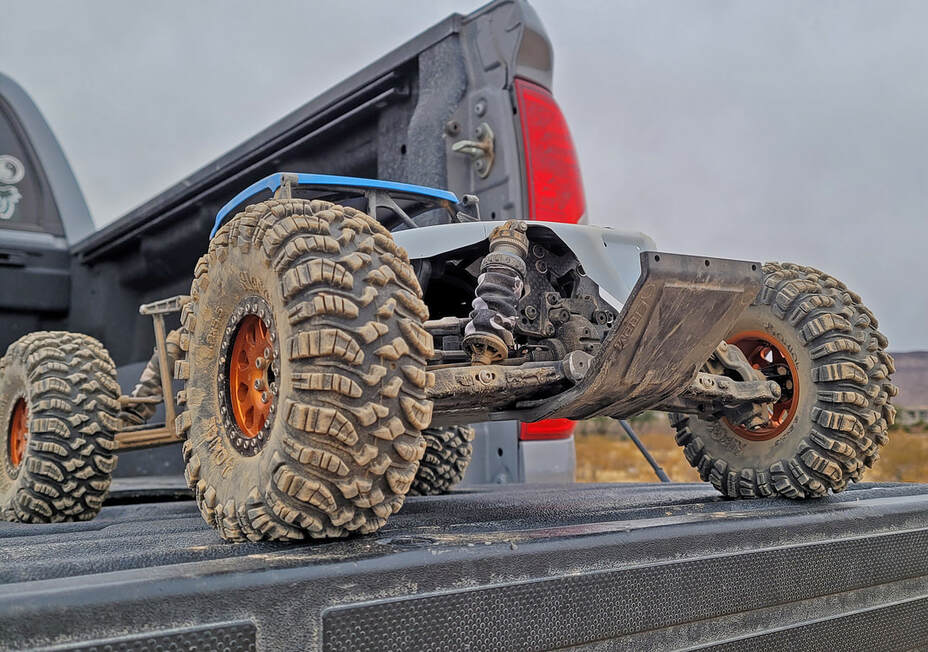 With some tweaking and tuning, the Lasernut is an absolute joy on the track.
Like many RTR’s, you sort of expect to change out electronics at some point.
When you purchase the Lasernut, go ahead and get a servo the same day. The factory servo is not up the challenge of steering such massive tires.
Do this right away and save yourself the headache. While you're at it, drop in some steering bearings and tighten down the servo saver, and you’ll not need to fool with that again for quite a while.
I’m still running the OEM Spektrum 1900 kV motor, but it’s not sounding so good. There have been multiple days at the track where the motor temps hovered around 150 degrees for a few hours, and while it's a good test of buggy durability, you can't expect the motor to not take a beating during the process. One could only guess as to how much fine dust is packed away inside the motor.
After this most recent track session, I have a feeling that it’s going to give up the ghost pretty soon, leaving me to figure out the next motor.
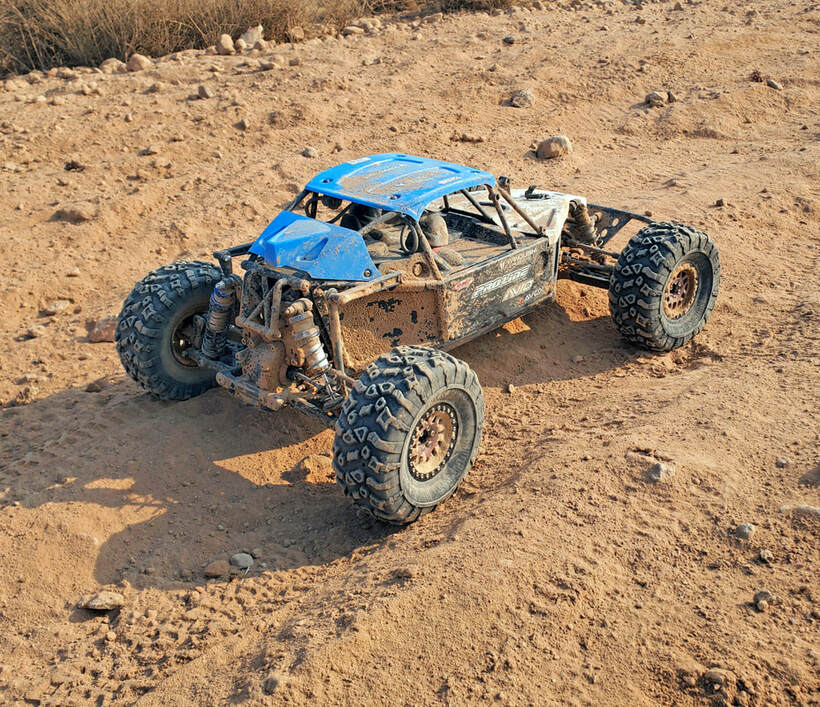 130mm tires are about as small as you want to go on the desert track.
Comparing the Lasernut to my other desert buggies, I feel it’s a solid C quality parts used in the build but delivers an A- level of performance.
It’s not a Tekno by any means, and it doesn’t have the fit and finish of a TLR or AE product, but it’s also a $500 RTR. Keep in mind my Tekno is nearly 3x the price, and there is always the "get what you pay for" aspect in RC. For $500, the Lasernnut is a pretty good purchase.
The Nomad DB-8 is simply outclassed by the Lasernut on virtually every desert or U4 rock racing track, even though the overall quality of the Nomad DB-8 is far superior. I’ve run them back to back and it’s not even close; the Lasernut dominates on the technical desert track.
Losi did a surprisingly good job and building a desert buggy / rock racer, and unless something far more advanced drops from the sky, or a high-end company like Tekno takes a serious dive into the desert buggy pool, this will be my go-to desert buggy.
I’m anxious to run head to head against the Rock Rey from Losi, but it’s hard to see a solid rear-axle buggy having any performance edge over the fully independent suspension of the Lasernut.
Over the past few weeks, I've been asked what a list of "required" upgrades would look like. As this review has pointed out, personally I'm only interested in desert track performance and all of my changes were done to enhance the Lasernut to suit the track conditions and technical challenges. That said, I do feel there is a short list of things that any Lasernut owner should seriously consider:
1. Servo
2. Tekno M6 Driveshafts and Lightened Outdrives (front/rear, SCTE)
3. Front bumper
4. Bearings in the steering bell cranks
5. TLR3100 Team Losi Racing Aluminum Rear Gearbox Bearing Insert Set
Outside of those changes, the rest will be up to the end user for their specific needs.
1. Servo
2. Tekno M6 Driveshafts and Lightened Outdrives (front/rear, SCTE)
3. Front bumper
4. Bearings in the steering bell cranks
5. TLR3100 Team Losi Racing Aluminum Rear Gearbox Bearing Insert Set
Outside of those changes, the rest will be up to the end user for their specific needs.
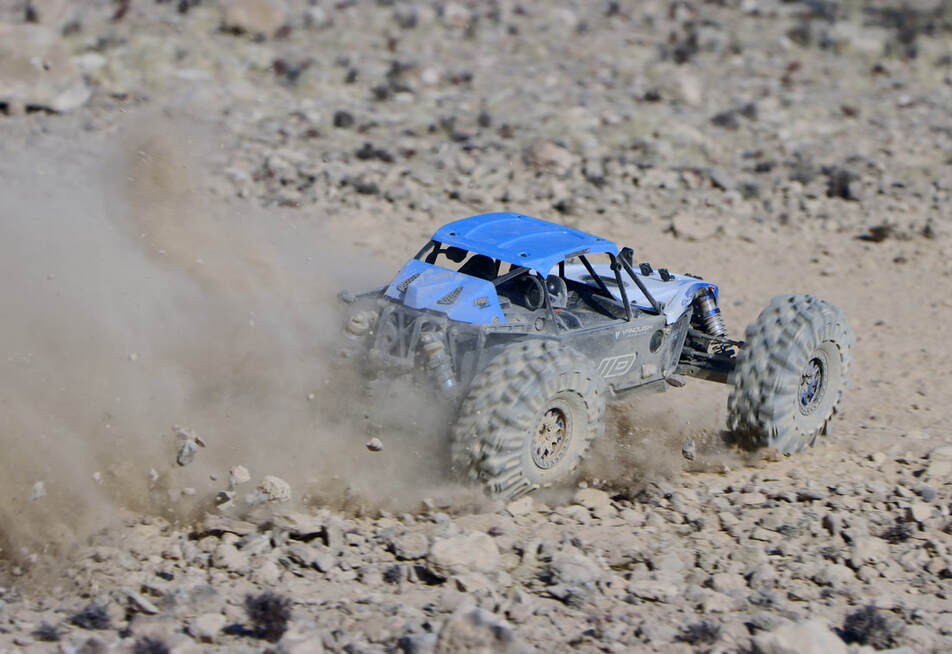 Losi Lasernut Chewing Up Rocks
"Durability" is an interesting concept in the RC community, with a wide range of expectations and experiences.
In this article, I've touched on a few personal observations as to what the Lasernut will and won't tolerate in terms of driving activities.
More than a few times I've pointed out that this is not a Basher, but there is actually more to this statement.
Now before we get too far down this road, just be aware that I'm gonna highlight a few things that need attention, and most likely it will rub a few readers the wrong way; you've been warned.
Durability is highly dependent on driving style, and there is a considerable number of RC people out there who drive like complete idiots. I've watched videos of people doing impressively stupid things with their buggy, then comment as to how "fragile" their buggy or truck is built. "I can't believe it broke after slamming into the curb at full speed..." Yep, I've seen many variants of this.
The other piece to this is that a driver's opinion about any vehicle formed after a few battery packs or even just observation without any firsthand experience is garbage. Those comments are not just useless, they are actually a roadblock on the quest for good information. Always check your source ( and source's actual hands-on experience ) when considering the comments about any vehicle.
The Lasernut is not a perfect machine, and there are plenty of things to upgrade, but keep in mind what you are dealing with. Forget Losi's advertising; it's little more than a carefully crafted "snap-shot" of time.
U4 Rock Racing is a game of attrition, with the main goal to survive the race, let alone win the race, and on our desert track (which is far more menacing that most U4RC tracks ), the Lasernut has taken a mighty beating and is still going. The parts I've changed out has been of no surprise to me, and overall I think this is a pretty darn good machine.
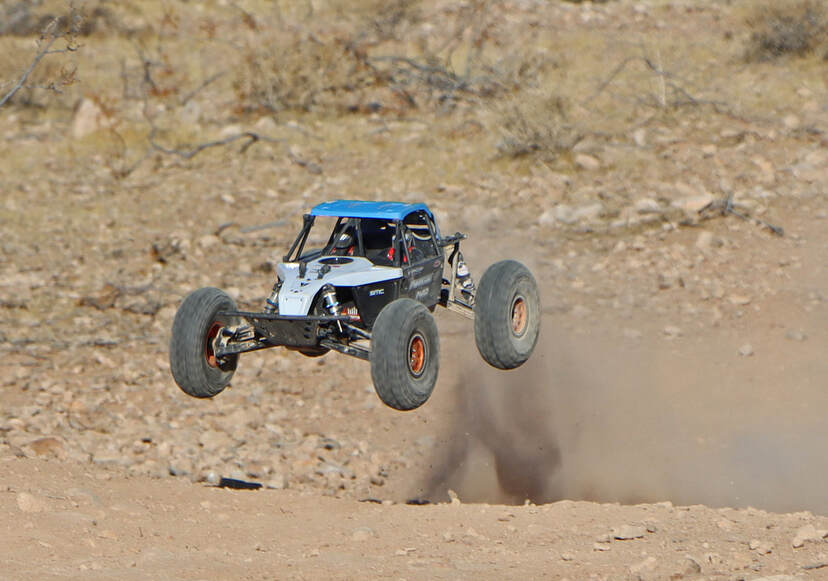 Another great lap with the Lasernut.
I feel that even with the additional investment in parts and upgrades, the Losi Lasernut is still an excellent value for the level of performance it delivers on the track. Just know that you’re going to need some of these upgrades if you intend to really use the Lasernut for anything more than casual driving.
Without knowing that Losi's future plans are, I feel a roller version of this from TLR would be well received. Dropping most of the flair and non-racing parts, and then incorporating some of the nicer TLR optional parts would make this highly desirable in the U4RC world. ARRMA has seen excellent sales results with their EXB roller line, and I think TLR would do well to add this to their suite of vehicles - as long as it's metric hardware.
Moving forward, it’s time to get more into tire / foam / wheel testing, and this topic will be handled in an upcoming subsection under the Lasernut.
I hope this review was of some value to you, and that it answers any questions you may have been thinking over in regards to this desert buggy.
-s
Last Update to above article: 2/10/2021
Ongoing updates
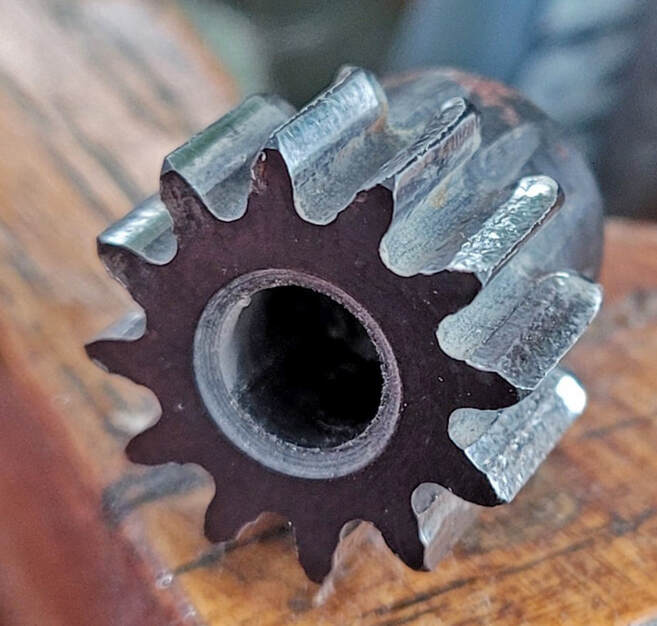 12 Tooth pinion gear is toast.
We are in the middle of tire testing on the Lasernut, with the OEM wheels and tires taking a good beating on the desert track.
During the last session the noise from the center diff section was becoming rather pronounced, so after the last battery was drained, the Lasernut was pulled apart for inspection and maintenance.
Removing the center differential and inspection, we found the factory 12-tooth pinion gear looking pretty ugly. The spur gear was also worn, but not nearly as bad as this pinion gear. I've never seen any of my aftermarket pinion gears this bad, so maybe it was either a bad batch of alloy used on the gear.
Either way, it's getting replaced today and a new spur gear installed.
s.
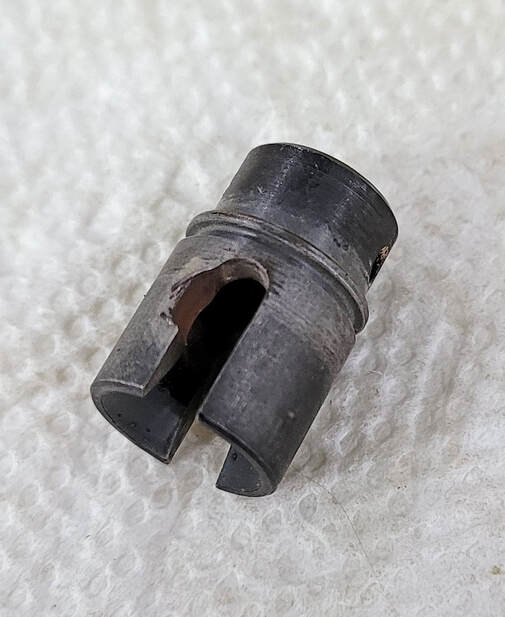 Front pinion gear coupler.
Another casualty is the front coupler to the pinion gear (LOS232024). I'm on my second set of driveshaft pins, and it looks that with the OEM parts, it will be a front coupler for every second driveshaft pin service.
I have on order a new pinion gear set and driveshaft coupler from the TLR line, and hopefully these are a harder metal alloy.
When you are spinning these massive tires, a tremendous amount of strain is being placed on the drivetrain. I'm pretty sure the original Tenacity wasn't spec's with 5.57" tall tires.